A Deep Dive into Gemma 3 Processor
Summary
-
Gemma 3 is a multimodal (image+text) model available in 1B/4B/12B/27B sizes. (1B is text-only)
-
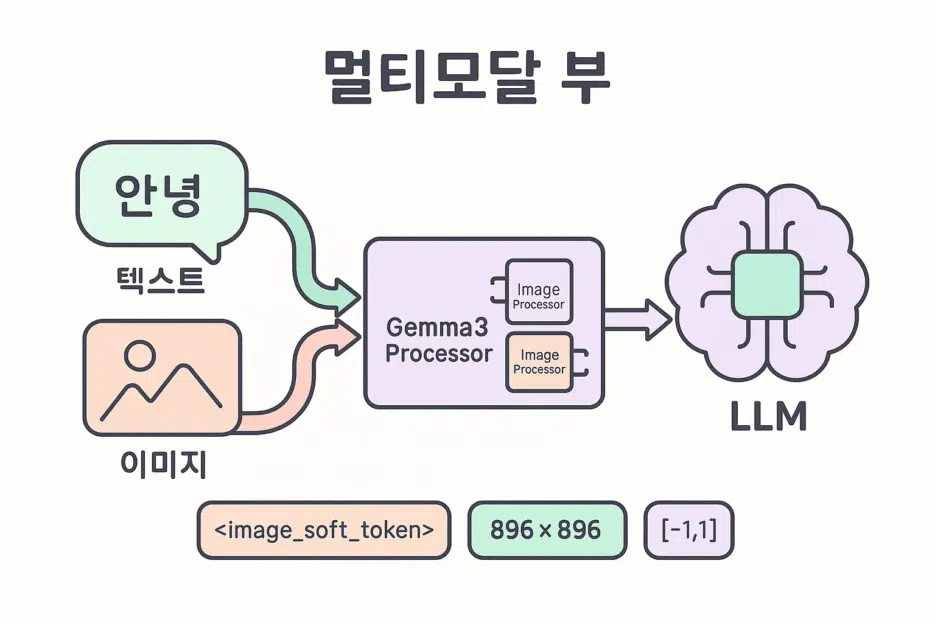
When you load the model, Gemma3Processor is automatically created, containing:
- Gemma3ImageProcessor for image preprocessing,
- GemmaTokenizerFast for converting text to tokens.
-
With a single call to
processor.apply_chat_template(...), you can convert image+text input into the format the model expects. -
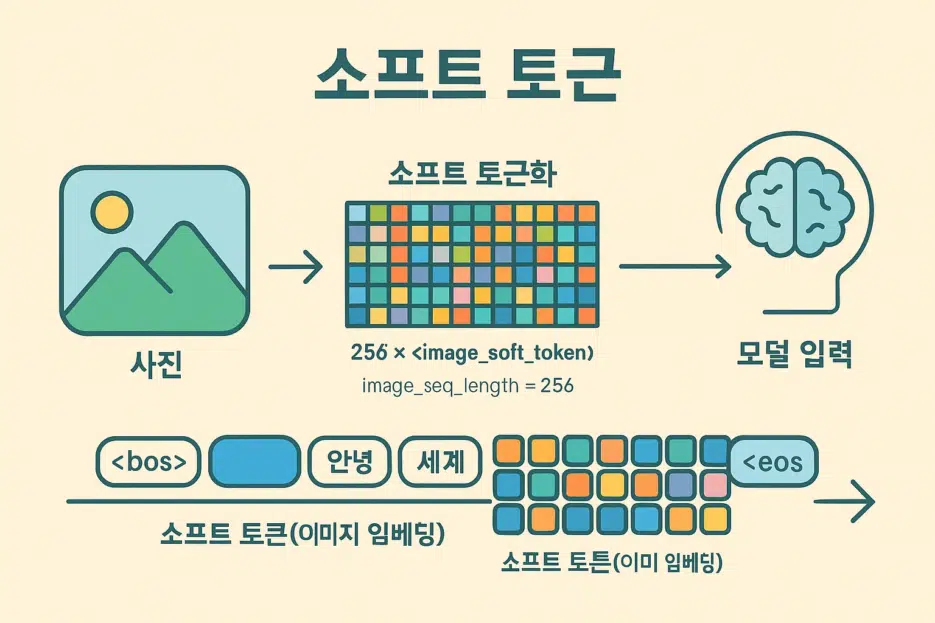
A single image is tokenized into 256
<image_soft_token>s by default. The actual pixel tensor has a shape of [1, 3, 896, 896].
First, Let's Define the Terms in 1 Minute!
- Multimodal: A model that processes multiple types of input simultaneously, not just text but also images/audio.
- Token: The basic unit that LLMs understand. Words/subwords/punctuation/special symbols are mapped to numbers.
- Tokenizer: A tool that converts text into a sequence of token IDs.
- Processor: An integrated tool that preprocesses input to make it digestible for the model. In Gemma3, image processing + tokenizer come as a set.
- Normalize: The process of scaling pixel values by mean/standard deviation.
- Rescale: Converting 0~255 pixels to the 0~1 range.
- Resize: Adjusting the image width x height to desired values.
- Padding: Filling in special tokens (e.g.,
<pad>) to match lengths. - Truncation: Cutting off sequences that are too long.
- Pan-and-Scan: A strategy of splitting into multiple crops when the aspect ratio is too extreme.
- Soft Token: Not discrete tokens like words, but learned continuous vector embeddings. Gemma 3 represents image information as a sequence of
<image_soft_token>.
Gemma 3 at a Glance
- Sizes: 1B / 4B / 12B / 27B
- Modality: 4B and above support image+text. 1B is text-only.
- How to Run: Can be executed via Ollama app, Python (ollama library), or Hugging Face Transformers.
Tip: Try testing 4B or larger multimodal locally and share your amazing caption/analysis results.
Quick Start (Transformers)
from transformers import AutoProcessor
processor = AutoProcessor.from_pretrained("google/gemma-3-4b-it")
print(processor)  # Gemma3Processor( image_processor + tokenizer )
If you want to load with different parameters:
processor = AutoProcessor.from_pretrained(
    "google/gemma-3-4b-it",
    do_pan_and_scan=True  # Automatically tiles images with extreme aspect ratios
)
Where to use?
processor.image_processor→ Access image preprocessing settingsprocessor.tokenizer→ Access text tokenization settings
Deep Dive into ImageProcessor
Gemma3ImageProcessor defaults (summary):
{
  "do_convert_rgb": null,
  "do_normalize": true,
  "do_pan_and_scan": null,
  "do_rescale": true,
  "do_resize": true,
  "image_mean": [0.5, 0.5, 0.5],
  "image_std": [0.5, 0.5, 0.5],
  "image_seq_length": 256,
  "size": {"height": 896, "width": 896}
Key Parameters Explained
do_convert_rgb(bool): Whether to convert the image to RGB.do_normalize(bool): Whether to normalize usingimage_mean/std.do_pan_and_scan(bool): Whether to split into multiple crops when aspect ratio is extreme.do_rescale(bool): Scale pixels to 0~1 range.do_resize(bool): Resize image to 896×896.image_seq_length(int): The soft token length occupied by one image (default 256).resample(enum): Interpolation filter used during resize (default Bilinear).rescale_factor(float): Typically 1/255.
Reading Attributes Example
processor.image_processor.do_normalize # True/False

Practical Tips
- Very tall screenshots benefit from
do_pan_and_scan=True. Fine-tune max crops/min size/trigger ratio withpan_and_scan_*parameters. - Square resize (896×896) means the original aspect ratio may not be preserved, causing compression/stretching. Use Pan-and-Scan or external preprocessing to compensate.
Tokenizer Overview (GemmaTokenizerFast)
name_or_path='google/gemma-3-4b-it'
vocab_size=262144
is_fast=True
padding_side='left'
truncation_side='right'
special_tokens={
  'bos_token': '<bos>', 'eos_token': '<eos>', 'unk_token': '<unk>', 'pad_token': '<pad>',
  'boi_token': '<start_of_image>', 'eoi_token': '<end_of_image>', 'image_token': '<image_soft_token>'
}
Reading Common Attributes
processor.tokenizer.vocab_size
processor.tokenizer.added_tokens_decoder[0]        # <pad>
processor.tokenizer.added_tokens_decoder[0].content
Special Tokens Summary
processor.decode([256000,108,82858,672,2471,528,8052,236761,106,107,105,4368,107])
=> '<end_of_image>
Describe this image in detail.<end_of_turn> <start_of_turn>model '
---
<br>
## Visualizing the Pixel Tensor
```python
import numpy as np
import pylab
tensor_image = np.transpose(inputs['pixel_values'][0], (1, 2, 0)) # CHW -> HWC
tensor_image = (tensor_image + 1) / 2 # [-1,1] -> [0,1]
pylab.imshow(tensor_image)
pylab.axis('off')
pylab.show()
Common Pitfalls
- Aspect ratio distortion: Fixed 896×896 resize can cause compression/stretching →
do_pan_and_scan=Truerecommended. - Memory: Feeding multiple images at once can cause VRAM usage to spike → Adjust batch size/resolution.
Running with Ollama / Transformers (Quick Notes)
- Ollama app/CLI: Easy to load and test models locally with a chat-like interface.
- Python (ollama): Load with a single line and integrate into your pipeline easily.
- Hugging Face Transformers: Most flexible for custom pre/post-processing, fine-tuning, and serving.
This article focused on using the Processor. Setup/deployment topics are covered in separate articles, so refer to those together!
Practical Recipes
-
Image Captioner
- Feed screenshots/photos and prompt "Describe in blog caption style."
- Also generate auto tag recommendations for community posts.
-
Style Analysis
- Feed multiple AI-generated artworks and ask "Extract common style keywords."
- Use results for follow-up prompt tuning.
-
Quality Check Bot
- Create a checklist for "composition/noise/color" and have AI self-review.
FAQ
Q. Why are there 256 <image_soft_token>s?
A. By Gemma 3's design, one image is summarized into a sequence of 256 tokens. Hence image_seq_length=256.
A. In Gemma 3's multimodal format, they serve as (image=1, text=0).