I've tried a really large number of image upscaling and restoration solutions since 2022. Latent Upscale, SD 1.5 Tile ControlNet, SDXL Tile ControlNet, SUPIR, FaithDiff, SeedVR2… It's no exaggeration to say I installed every new release over the past 3 years. Each had its pros and cons, but there was never a solution that "preserved the original while enhancing details and being fast." Whenever you got one thing right, something else fell short.
But recently I set up a workflow using Qwen Image Edit 2511 as an upscaler, and honestly it has the best balance of anything I've tried. The speed is decent, original distortion is minimal, and detail restoration is solid. Let me walk through step by step how to run it in ComfyUI (a node-based AI image generation tool).
Limitations of What I've Tried Before
Let me briefly summarize my upscaling journey so far:
Tile ControlNet (SD 1.5 / SDXL). The detail-adding capability was impressive. But the problem was its tendency to "create details that weren't there" — patterns that didn't exist in the original would appear, or textures would change excessively. It was especially unstable with images containing patterns or text.
SUPIR. It worked really well for group photo restoration. The advantage was clean restoration without adding strange elements, but it was slow. And it consumed a lot of VRAM (graphics card memory), so even on my setup (RTX 3090), OOM (out of memory) errors occasionally occurred.
SeedVR2. Quality was excellent but way too slow. If each image takes 2–3 minutes, batch processing becomes realistically impossible. The results themselves were good, but it failed on practicality.
FaithDiff. Not bad, but occasionally produced strange results in face restoration.
Then I learned that Qwen Image Edit 2511 could be used for upscaling, and it covered many of the weaknesses of existing solutions.
What Is Qwen Image Edit 2511
Qwen Image Edit 2511 is an image editing model released by Alibaba's Qwen team in November 2025. Its original purpose is image editing (outfit swapping, maintaining character consistency, etc.), but the community discovered that feeding it upscaling/restoration prompts turns it into a super high-resolution restorer.
Character consistency improved over the previous version (2509), and image drift (the phenomenon where edits gradually deviate from the original) was also reduced. The model is available for download on HuggingFace, and running it via ComfyUI workflows is the most common approach.
ComfyUI Workflow Setup
DiT Model Loading
The main diffusion model uses qwen_image_edit_2511_fp8mixed.safetensors. Search for the model name on HuggingFace and you'll find the download link.
fp8mixed is an 8-bit floating-point quantization strategy (a technique that reduces model size to save VRAM). The "mixed" part means different precision levels are applied per layer. It uses far less VRAM than the full precision model with virtually no difference in output quality, so using this is the right choice for most setups.
The key node is ModelSamplingAuraFlow, which switches the model to AuraFlow-style noise scheduling (a method of adjusting the order and intensity of noise removal during the image generation process). Since Qwen Image Edit 2511's Lightning 4-step LoRA (a speed optimization technology that compresses the generation process from dozens of steps down to just 4) was trained on the assumption of AuraFlow sampling, you need to use this instead of standard SD/EDM-style diffusion.
Here you set shift = 3.0, which controls "how much to change the original." The reason 3.0 is the sweet spot:
It preserves the structure of the input image while allowing meaningful detail changes and avoiding the excessive smoothing that occurs at lower shift values. Theoretically, 1.0–2.0 makes edits too weak and 4.0+ can cause distortion, but honestly I tried everything from 2.5 to 3.5 and the perceived difference wasn't huge. 3.0 is a safe default value, so it's just easier to stick with it.
CFGNorm (a value that controls how faithfully the generated result follows the prompt) is set to 1.0. Traditional diffusion models would use CFG of 7–12, but here we're using the special combination of AuraFlow + Lightning LoRA 4-step, so high CFG isn't needed. In fact, raising it creates artifacts (artificial noise or distortion that appears in images).
VAE and Text Encoder
Loading the VAE (a module that compresses/decompresses images) and CLIP (a module that understands text prompts) is straightforward. I use two SetNode nodes to hold the VAE object and CLIP object separately, which helps reduce the spaghetti-like tangling of connection lines. Anyone who's used ComfyUI knows that wire management becomes absolute hell as the number of nodes grows.
Input Image Preparation
The blurry source image is resized 6x using Lanczos interpolation (an algorithm that smoothly handles edges when scaling up pixels). The 6x factor is key here — you need to secure sufficient pixel space before feeding it to the diffusion model for details to come alive during the restoration process. Feeding a small image as-is without resizing dramatically worsened the results.
Upscaling Prompt
This is the core of the workflow — once you write the prompt, you can use it identically for all images. Not needing to extract prompts from source images one by one using a VLM (an AI that generates text descriptions by looking at images) is a huge advantage.
Positive prompt:
Restore and upscale this image. Remove noise, blur, JPEG artifacts, and banding. Recover fine details and natural textures. Improve clarity and sharpness while keeping the exact same composition, lighting, colors, perspective, and subject identity. No content changes.
Results — An Honest Assessment
Comparing the decoded output with the original, the detail restoration is definitely impressive. Here's a breakdown by category I tested:
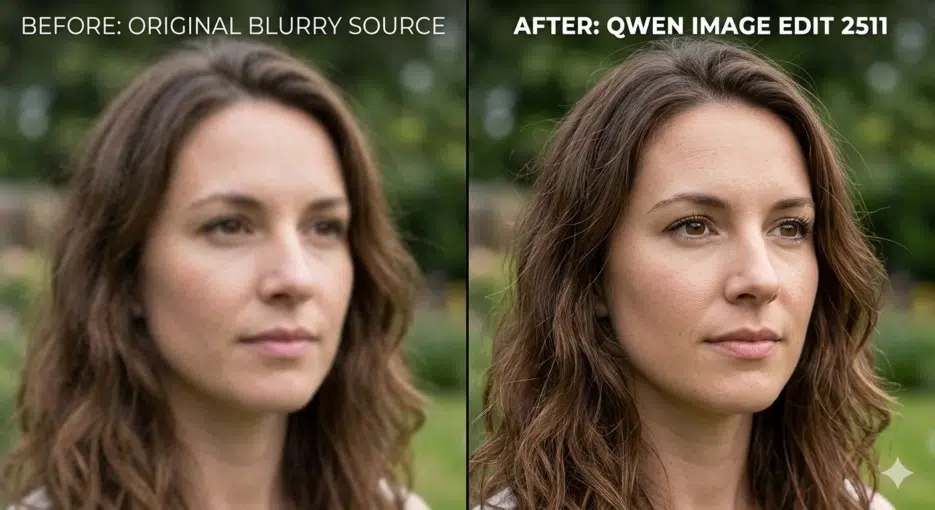
Human faces. This is where it performs best. Feed in a blurry face photo and skin texture, iris detail, and hair strands are naturally restored — looking like "details that should have been there" rather than "AI-fabricated details." SUPIR was also decent in this regard, but Qwen is overwhelmingly faster.
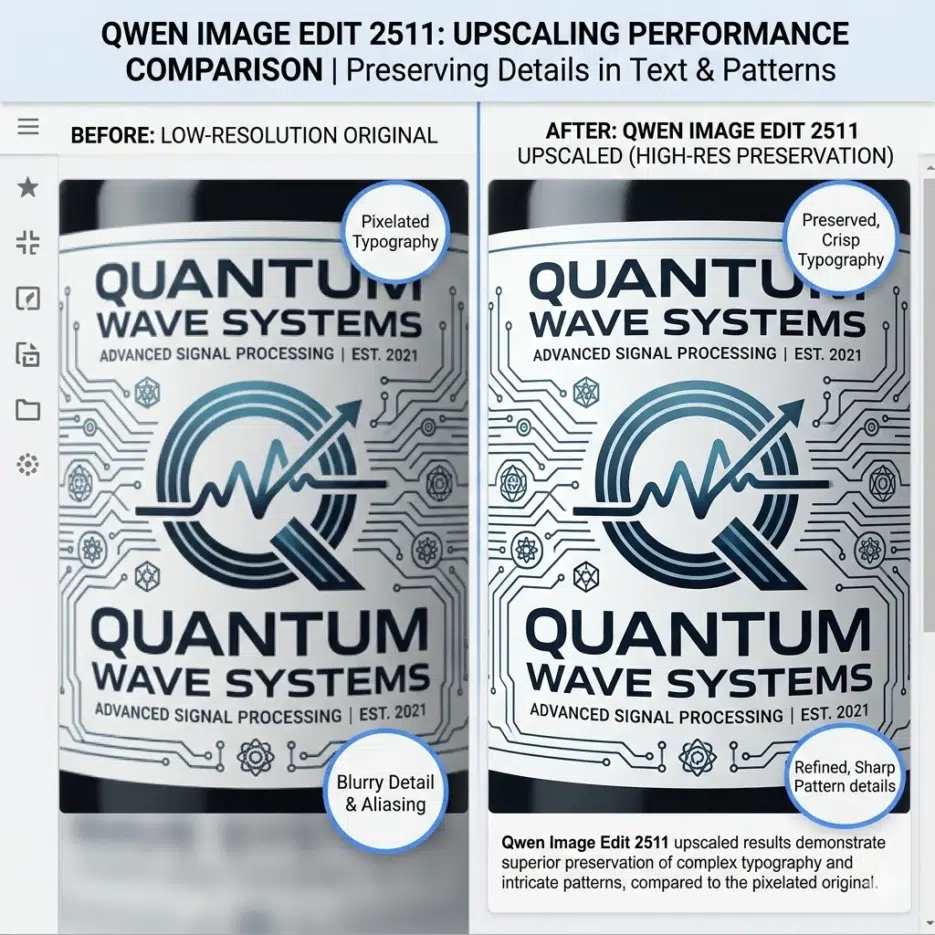
Patterns and text. This is where the clear advantage over Tile ControlNet shows. When upscaling images containing logos or text, letters don't break and patterns are maintained. Of course it's not 100% perfect, but compared to existing solutions that almost always destroyed text, it's a massive improvement.
Landscapes/photographs. Fine textures like leaf details and building elements come through well. I liked the natural sharpness without excessive sharpening.
What's Better Compared to Existing Solutions
In one line: "It's fast without destroying the original."
Tile ControlNet had incredible detail addition but severe original distortion, SUPIR was stable but slow and VRAM-hungry, and SeedVR2 had great quality but 2–3 minutes per image made it impractical for real work. Qwen Image Edit 2511 delivers results in just 4 steps thanks to Lightning LoRA. On my setup (RTX 3090, 24GB VRAM) with 1024×1024 input, it takes about 15 seconds per image? That's a speed where batch processing is realistically possible.
And the biggest advantage is not needing a VLM to extract prompts from source images. Previous diffusion-based upscalers required separately creating prompts describing what's in the image, but Qwen Image Edit handles all images with the single universal prompt written above. The workflow becomes incredibly simple.
There Are Clear Limitations
It's premature to declare it "the best upscaler." Models like Z-Image Turbo are said to be better than Qwen in terms of photorealism, and the dominant community opinion is that "each model has different strengths." Rather than "the best in all situations," it's more accurate to say it's the most balanced solution under the specific criteria of "original preservation + speed."


